How to Approve and Disburse a Reimbursement Request

Rho users with expense approval permissions can review reimbursement requests and approve or reject them, similarly to other expenses flowing from a Rho Card.

Approving reimbursement requests

All reimbursements that aren't auto-approved once they meet the documentation rules require an approver to manually review and approve or reject the transaction.

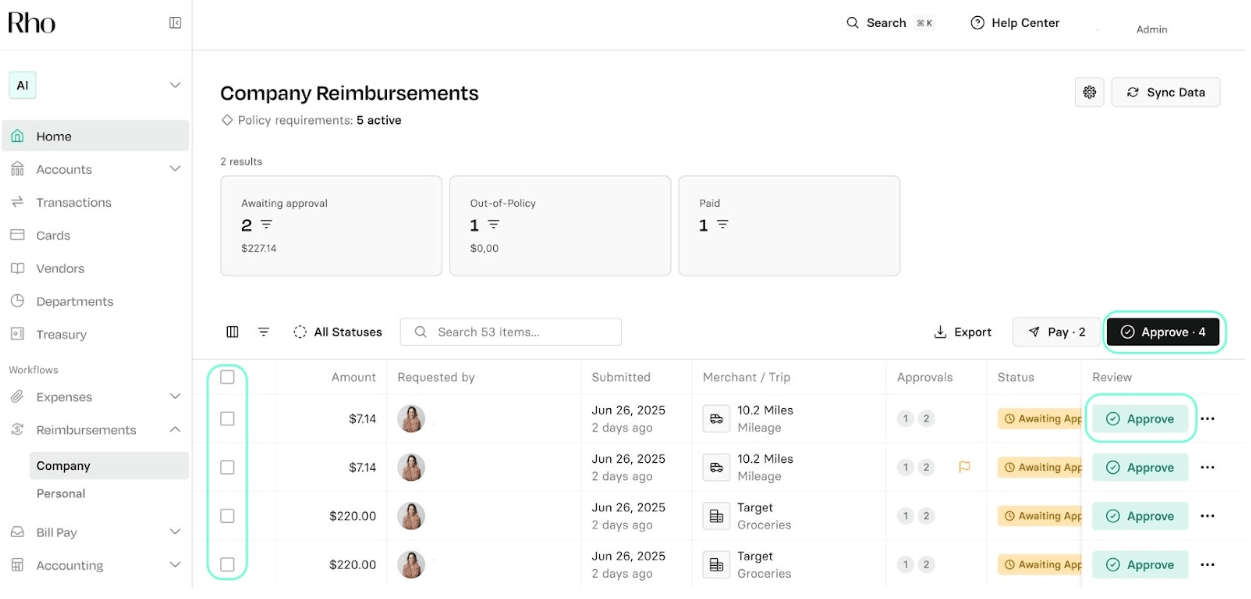
To view reimbursements that require approval, click on Reimbursements from the navigation bar, then use the Status filter to narrow down which transactions you'd like to view, like Awaiting Approval and Awaiting Payment Approval. 

To approve a reimbursement request, you can click on the transaction, which will open the transaction details on the right side of the dashboard. Here, you can review all attributes of the transaction and click Approve or Reject at the bottom.

You can also click Approve next to individual items from the table view directly, or select multiple items by checking the boxes on the left, then bulk approve by clicking the Approve button above the table.

Disbursing reimbursement requests

To pay reimbursement requests (send funds to employees via ACH), users with payment permissions can navigate to the Reimbursement tab, and either click on Pay next to individual items in the table, or select multiple items by checking the boxes on the left, and perform a bulk payout by clicking the Pay button above the table.

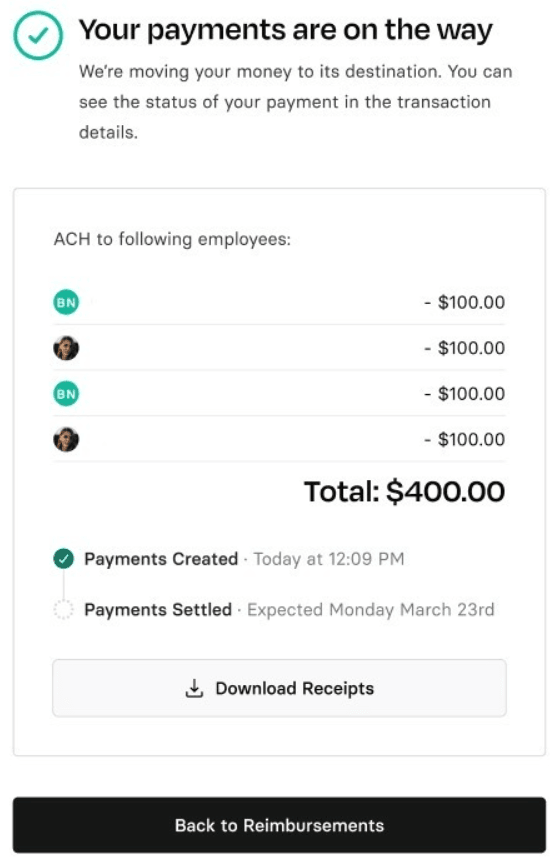
From there, you'll see all pending disbursements per user. By clicking Pay Total, you can pay them all out in one payment per user.

You then confirm which account the payment should come from and click Continue.

Payouts submitted before 3 p.m. ET should arrive in your employees' accounts the same day. If submitted after 3 p.m. ET, funds will arrive the next business day.

You can also manually flag a payment as being paid outside of the Rho platform (ex., Via Payroll). Click the 3-dot icon to see Mark as Paid. Reimbursements marked as paid will no longer show up in the disbursement queue.

Reimbursement transactions that are paid out will show a Pending Payment status in the original transaction drawer, followed by Paid.

Popular help center articles

Most read this week.

Accounting

How to set up Rho's QuickBooks Integration

The following instructions describe how to set up a direct integration between your Rho Account and your existing QuickBooks Online account. If you're interested in connecting Rho transactions via the QuickBooks Bank Feed, see instructions here . Note: this integration is only compatible with QuickBooks Online. For QuickBooks Desktop, you can download a CSV of transactions from your Rho account via these steps and upload them to QB Desktop). Once you are signed into the Rho platform, click Integrations in the navigation bar. Click the QuickBooks icon. Follow the login instructions to connect to your QuickBooks account. When finished, click Accounting in the navigation bar. Select the transactions you want to sync. Click the Sync button. When you connect Quick Books to Rho, a new account is added to your CHART OF ACCOUNTS tab named RHO [Checking Acct#] , where [Checking Acct#] is the 10-digit account number associated with the linked Rho account. This is your primary account and is required for automatic account reconciliation. You can rename this account, but integration between your Rho account and Quickbooks will not work if the account is deleted. What information can I view in the Accounting Tab? Once you have connected QuickBooks to Rho, use the Accounting Tab in the Rho platform to manage mapping rules, view transactions, and make necessary changes. The Accounting Tab includes two subsections Dashboard and Mapping Rules. Learn more about what you can view in the Dashboard here and about what you see in the Mapping Rules here. Important Integration Notes Syncing with your QuickBooks account is a manual process. Each time you want to reconcile your Rho Account in QuickBooks, you must click the Sync button. However, you can set up automatic recurring syncs by going to the settings tab within your accounting workflow and setting a recurring sync.

General Rho Information

How Do I Contact Support?

Reach out to our dedicated Rho specialists anytime over the phone at 1 (855) 7-GETRHO, through email at clientservice@rho.co, or start a live chat by logging into your Rho account (web or app), clicking the Help button in the lower left, and selecting 24/7 live support.

Cards

How to Add Your Rho Card to your Digital Wallet

Your virtual & physical Rho cards can now be added to your Apple or Google Wallet for a quick, contactless, and secure way to pay. Note: Currently, we don't support adding Rho cards to WeChat. Set up is simple - follow the steps below to get started: Apple Wallet Go to your Wallet app and click the + button in the right-hand corner. Select the Card Type “Credit”. Hold your Rho physical card's chip near your device or place it directly on the screen. For a virtual card, choose the “Enter Card Details Manually” option to add your card. Verify your card details are correct and enter your 3-digit CVV security code. You should notice the "Card Added" confirmation after a few moments. For your added security, you may be asked to verify your Rho Card account via two-factor authentication by “Text Message”, “Email”, or "Authenticator App", if you have set it up. A six-digit code will be sent to your email address, phone number on file, or the Authenticator App, enter your code in the field provided. Your Rho Card is now active in your Apple Wallet and ready to use at contactless point-of-sale terminals that support Apple Pay. For more information, see Apple’s support document . How to use your Rho Card in Apple Pay at a contactless point-of-sale terminal Select your Rho Card via the Apple Wallet app. Double-click the right-hand button on the side of your iPhone when a near contactless point-of-sale terminal. Verify your identity using Face ID or your Passcode. You will now be prompted to hold your phone near the contactless reader. Hold near the reader until the purchase has been completed. Google Wallet Your virtual & physical Rho cards can now be added to your Google Wallet on your Android device for a quick, contactless, and secure way to pay. Set up is simple - follow the steps below to get started: Open your Google Pay (GPay) app on your Android device and click the image of a card in the right-hand corner. This will open a screen that shows you all the cards you have linked to your wallet. Select “Add a Card” at the bottom of the screen. Select the Payment Method “Credit or debit card.” Take a picture of your Rho physical card or the virtual card in your Rho dashboard. Your phone will recognize your card details and then you must enter your 3-digit CVV security code. Alternatively, you may enter your card details manually. Make sure your address, ZIP code, and phone number match your settings in your Rho account. The address should be your organization’s billing address. Press Save. Review Rho’s Terms & Conditions and click “Accept & continue.” For your added security, you may be asked to verify your Rho Card account via two-factor authentication by “Text Message” or “Email.” After you receive your six-digit verification code by text or email, enter it and click Submit. Your Rho Card is now active in your Wallet and ready to use at contactless point-of-sale terminals that support Google Pay. For more information visit the Google Pay Help Center

Mobile App

How to Upload a Receipt in the Mobile App

You can add receipts to all Rho Card transactions within the app ( in addition to desktop, email, and SMS uploads ). To add a receipt, open the Rho app and tap on the transaction requiring a receipt. In the Attachments section, click "Upload Receipt" and choose one of the following options: Select an image from your camera roll Take a photo of your receipt using your camera Select and upload a file Note: Be sure to include any applicable tip amount on your receipt. In the transaction details window, you can also add departments, labels, and notes to your transaction.