How to Create a New Rho Card

Create a card

You can create a new Rho Card with a few simple steps, by navigating to your Cards Tab > All Cards, and clicking the black and green + Create Card button in the top right-hand corner. From the dropdown, select if you'd like to create a card for yourself or someone else, or bulk create cards.

Screen Shot 2023-10-12 at 1.19.27 PM.png

In the pop-up window, select whether you want to create a physical or virtual Rho Card.

Rho will send the physical card by mail. Virtual cards can be used instantly upon creation, both online and via Apple Pay or Google Pay.

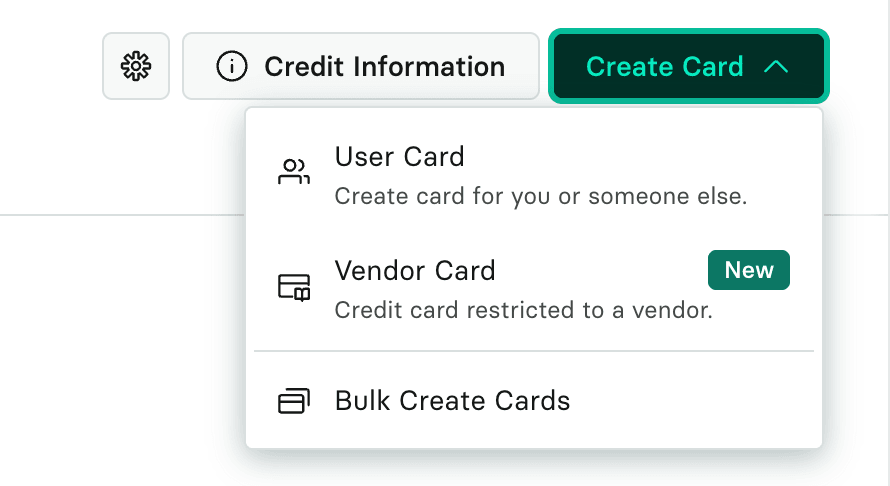
Set up your physical card

If you select Physical Card, you can set up your card in the below screen:

__wf_reserved_inherit

  • Card Name: Personalize your card by choosing the name you would like displayed.

  • Card Limit (optional): Specify the maximum amount of money that can be spent monthly using the Rho Card, if desired. By default, the amount is in United States Dollars.

  • Assign Rho attributes (optional): If desired, you can assign attribute values for specific cards, so transactions from these cards are automatically mapped to these specific values without further manual mapping required.

  • Merchant Controls (optional): If desired, restrict Rho Card transactions to only select merchants or the categories selected from the drop-down list. For example, you can select Airlines, Air Carriers and Airports, Flying Fields, if you want the card to only be used for air travel expenses.

  • International Spend: This feature is enabled by default, which means the card can be used outside the U.S. To disable it, simply toggle it to "Off" and click "Save."

Once you've filled in these details, click Continue and you'll be prompted to enter the Billing and Shipping Address. Once completed, you'll see a confirmation that your physical card has been ordered.

Notes:

  • We cannot ship physical Rho cards to P.O. Boxes. Physical card shipping addresses must be physical addresses.

  • Physical cards and virtual cards cannot share numbers, CVV codes, or expiration dates. Each created card is its own unique card, therefore two cards, one virtual, and one physical cannot have the same number or be used as the same card.

  • If you order a physical Rho Card, you will receive an email when the card has been mailed to your address. Typically Rho Cards arrive via Fed Ex within 2-3 business days. In case it takes longer, please reach out to our Client Service to request the tracking number.

  • Rho can ship physical cards internationally. Follow the same card creation flow, and enter an international shipping address.

Activate a Rho card

For security purposes, Rho cards must be activated before use.

Activate using the QR code

Physical cards can only be activated by scanning the unique QR code included with the card mailer.

  1. Locate the QR code included in the card package.

  2. Scan the QR code using your device.

  3. Follow the prompts to confirm and activate the card.

Activate by logging into Rho directly

Cards can also be activated directly in the Rho platform. Simply log in, navigate to Cards, select the card, click Activate card, confirm activation.

Set up your virtual card

If you select virtual card, you can add additional controls. For more information about these card controls, see here.

__wf_reserved_inherit

Once you've filled in these details, click Continue and you'll see a confirmation that your virtual card has been created.

Popular help center articles

Most read this week.

Accounting

How to set up Rho's QuickBooks Integration

The following instructions describe how to set up a direct integration between your Rho Account and your existing QuickBooks Online account. If you're interested in connecting Rho transactions via the QuickBooks Bank Feed, see instructions here . Note: this integration is only compatible with QuickBooks Online. For QuickBooks Desktop, you can download a CSV of transactions from your Rho account via these steps and upload them to QB Desktop). Once you are signed into the Rho platform, click Integrations in the navigation bar. Click the QuickBooks icon. Follow the login instructions to connect to your QuickBooks account. When finished, click Accounting in the navigation bar. Select the transactions you want to sync. Click the Sync button. When you connect Quick Books to Rho, a new account is added to your CHART OF ACCOUNTS tab named RHO [Checking Acct#] , where [Checking Acct#] is the 10-digit account number associated with the linked Rho account. This is your primary account and is required for automatic account reconciliation. You can rename this account, but integration between your Rho account and Quickbooks will not work if the account is deleted. What information can I view in the Accounting Tab? Once you have connected QuickBooks to Rho, use the Accounting Tab in the Rho platform to manage mapping rules, view transactions, and make necessary changes. The Accounting Tab includes two subsections Dashboard and Mapping Rules. Learn more about what you can view in the Dashboard here and about what you see in the Mapping Rules here. Important Integration Notes Syncing with your QuickBooks account is a manual process. Each time you want to reconcile your Rho Account in QuickBooks, you must click the Sync button. However, you can set up automatic recurring syncs by going to the settings tab within your accounting workflow and setting a recurring sync.

General Rho Information

How Do I Contact Support?

Reach out to our dedicated Rho specialists anytime over the phone at 1 (855) 7-GETRHO, through email at clientservice@rho.co, or start a live chat by logging into your Rho account (web or app), clicking the Help button in the lower left, and selecting 24/7 live support.

Cards

How to Add Your Rho Card to your Digital Wallet

Your virtual & physical Rho cards can now be added to your Apple or Google Wallet for a quick, contactless, and secure way to pay. Note: Currently, we don't support adding Rho cards to WeChat. Set up is simple - follow the steps below to get started: Apple Wallet Go to your Wallet app and click the + button in the right-hand corner. Select the Card Type “Credit”. Hold your Rho physical card's chip near your device or place it directly on the screen. For a virtual card, choose the “Enter Card Details Manually” option to add your card. Verify your card details are correct and enter your 3-digit CVV security code. You should notice the "Card Added" confirmation after a few moments. For your added security, you may be asked to verify your Rho Card account via two-factor authentication by “Text Message”, “Email”, or "Authenticator App", if you have set it up. A six-digit code will be sent to your email address, phone number on file, or the Authenticator App, enter your code in the field provided. Your Rho Card is now active in your Apple Wallet and ready to use at contactless point-of-sale terminals that support Apple Pay. For more information, see Apple’s support document . How to use your Rho Card in Apple Pay at a contactless point-of-sale terminal Select your Rho Card via the Apple Wallet app. Double-click the right-hand button on the side of your iPhone when a near contactless point-of-sale terminal. Verify your identity using Face ID or your Passcode. You will now be prompted to hold your phone near the contactless reader. Hold near the reader until the purchase has been completed. Google Wallet Your virtual & physical Rho cards can now be added to your Google Wallet on your Android device for a quick, contactless, and secure way to pay. Set up is simple - follow the steps below to get started: Open your Google Pay (GPay) app on your Android device and click the image of a card in the right-hand corner. This will open a screen that shows you all the cards you have linked to your wallet. Select “Add a Card” at the bottom of the screen. Select the Payment Method “Credit or debit card.” Take a picture of your Rho physical card or the virtual card in your Rho dashboard. Your phone will recognize your card details and then you must enter your 3-digit CVV security code. Alternatively, you may enter your card details manually. Make sure your address, ZIP code, and phone number match your settings in your Rho account. The address should be your organization’s billing address. Press Save. Review Rho’s Terms & Conditions and click “Accept & continue.” For your added security, you may be asked to verify your Rho Card account via two-factor authentication by “Text Message” or “Email.” After you receive your six-digit verification code by text or email, enter it and click Submit. Your Rho Card is now active in your Wallet and ready to use at contactless point-of-sale terminals that support Google Pay. For more information visit the Google Pay Help Center

Mobile App

How to Upload a Receipt in the Mobile App

You can add receipts to all Rho Card transactions within the app ( in addition to desktop, email, and SMS uploads ). To add a receipt, open the Rho app and tap on the transaction requiring a receipt. In the Attachments section, click "Upload Receipt" and choose one of the following options: Select an image from your camera roll Take a photo of your receipt using your camera Select and upload a file Note: Be sure to include any applicable tip amount on your receipt. In the transaction details window, you can also add departments, labels, and notes to your transaction.