
Auto-transfer rules automatically move funds between your Rho Checking and Treasury accounts. Use them to keep your operating account funded and/or reduce manual transfers.
This article explains the available rule types, how to set them up, and how they work.
What are auto-transfer rules?
Auto-transfer rules automatically move funds between your Rho Checking and Treasury accounts based on a schedule and/or balance threshold you define.
You can create two types of rules:
Recurring transfers
Move a fixed amount between accounts on a schedule you choose, including:
Daily
Weekly
Monthly
Custom dates
Maintain balance rules
Automatically move funds when your account balance crosses the threshold you set.
Choose one of the following:
Minimum balance: Transfer funds into an account when its balance falls below your target.
Maximum balance: Sweep excess funds out of an account when its balance exceeds your target.
$0 balance: Sweep the full available balance on each execution date.
Set up an auto-transfer rule
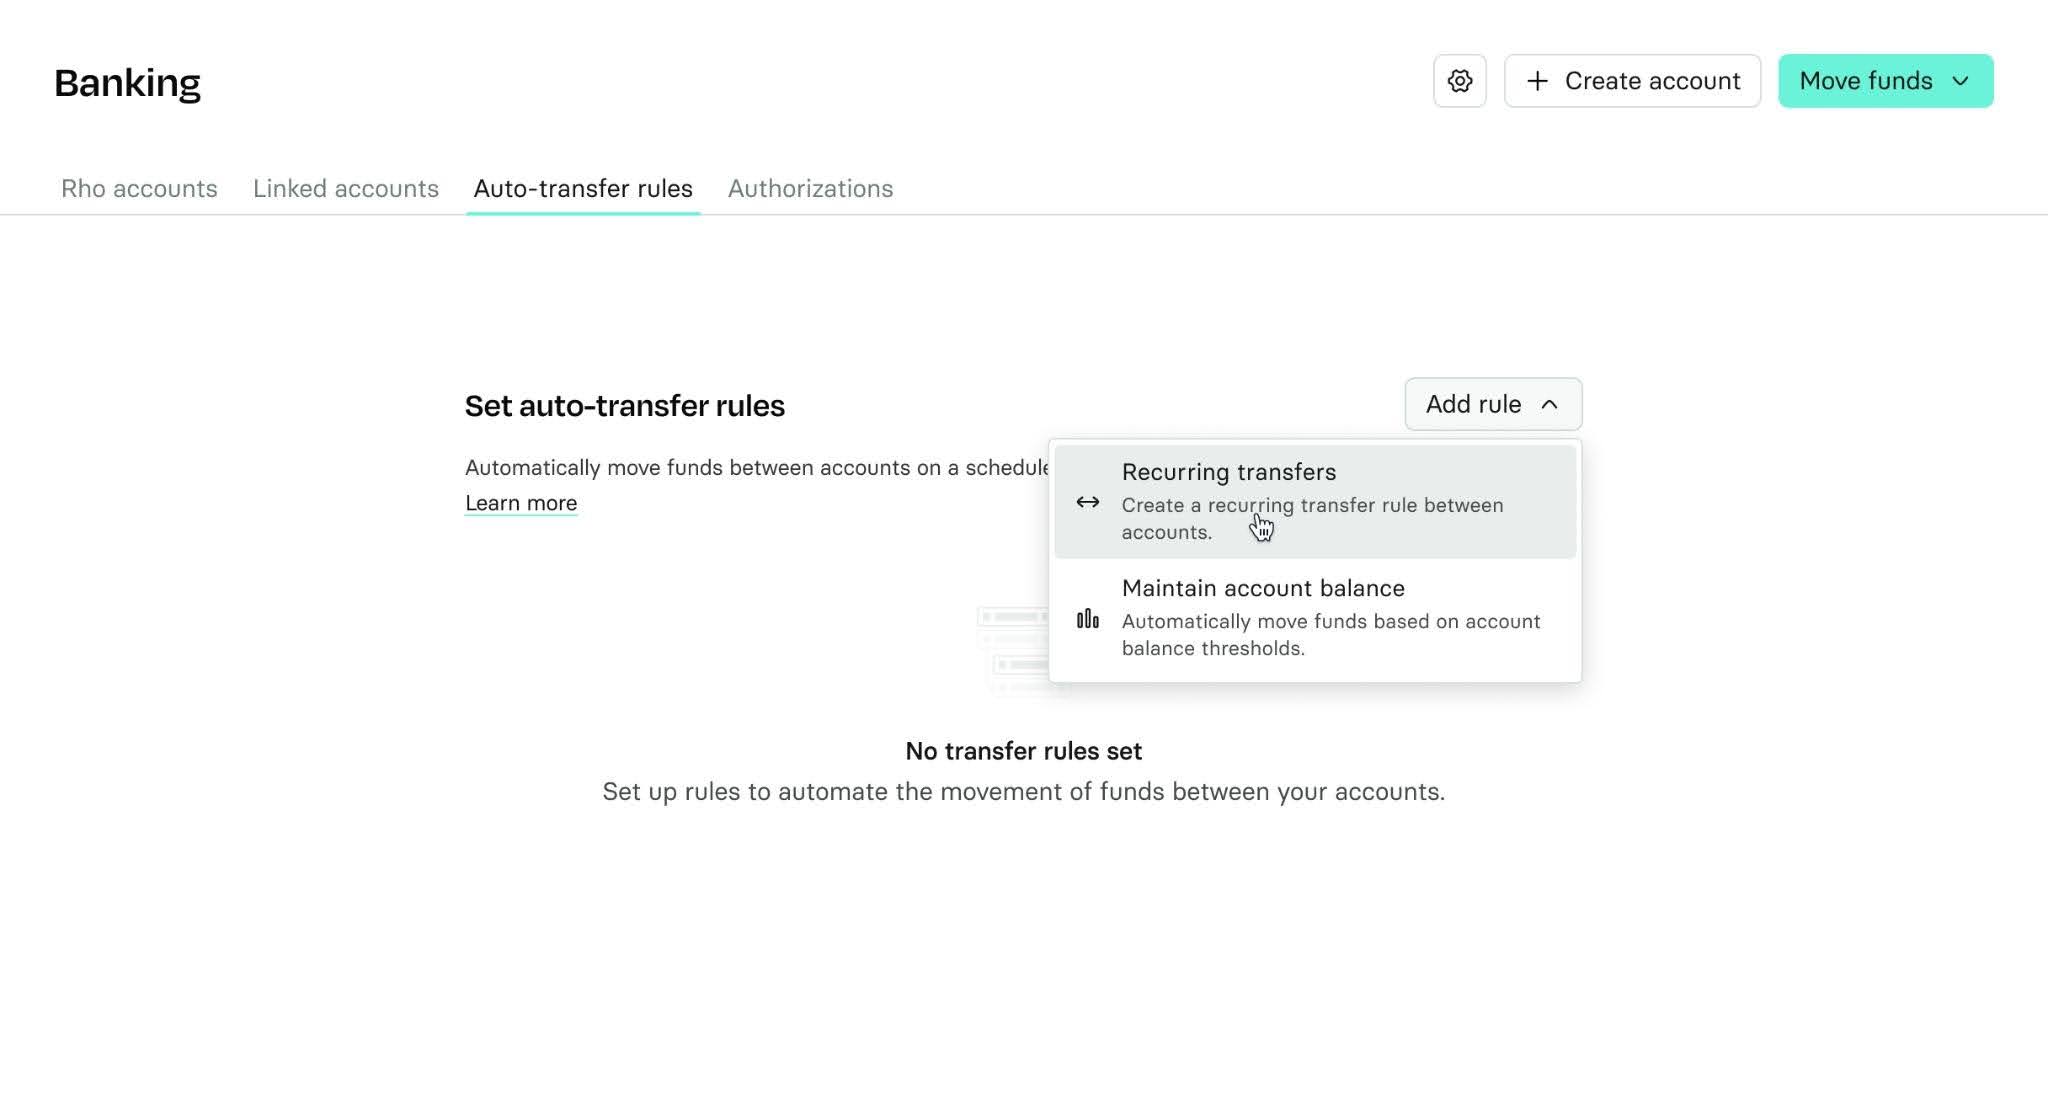
Go to All Accounts > Auto-transfer rules > Add rule.
Choose a rule type.
Select your source and destination accounts.
Configure the amount or balance threshold and your schedule.
Click Create rule.
Your rule becomes active immediately.
 After a rule is created, the source and destination accounts can't be changed. To use different accounts, delete the rule and create a new one. You can edit the amount and schedule at any time.
How auto-transfer rules work
Auto-transfer rules are evaluated at 8:00 a.m. ET.
Treasury rules don't run on weekends or market holidays. If a scheduled run falls on one of those days, it runs on the previous applicable business day unless otherwise noted.
Recurring transfers
Recurring transfers settle on the date you select.
The selected date is the settlement date, not the date the transfer is initiated. Rho automatically initiates the transfer early enough for funds to settle on your chosen date.
Maintain balance rules
Maintain balance rules evaluate your account balance at 8:00 a.m. ET on applicable business days.
If your balance falls outside the threshold, Rho schedules a transfer that will settle on the configured arrival date.
The selected date is the settlement date, not the date the transfer is initiated. Rho automatically initiates the transfer early enough for funds to settle on your chosen date.
How transfer dates work
Transfer direction | Date you select | How it works |
Checking → Checking | Settlement date | Transfer settles on the selected date. |
Treasury → Checking | Settlement date | Rho initiates the transfer 3 business days before settlement and adjusts earlier for weekends and market holidays. |
The date you select is the settlement date. Rho initiates the transfer in advance so your funds arrive on that date.
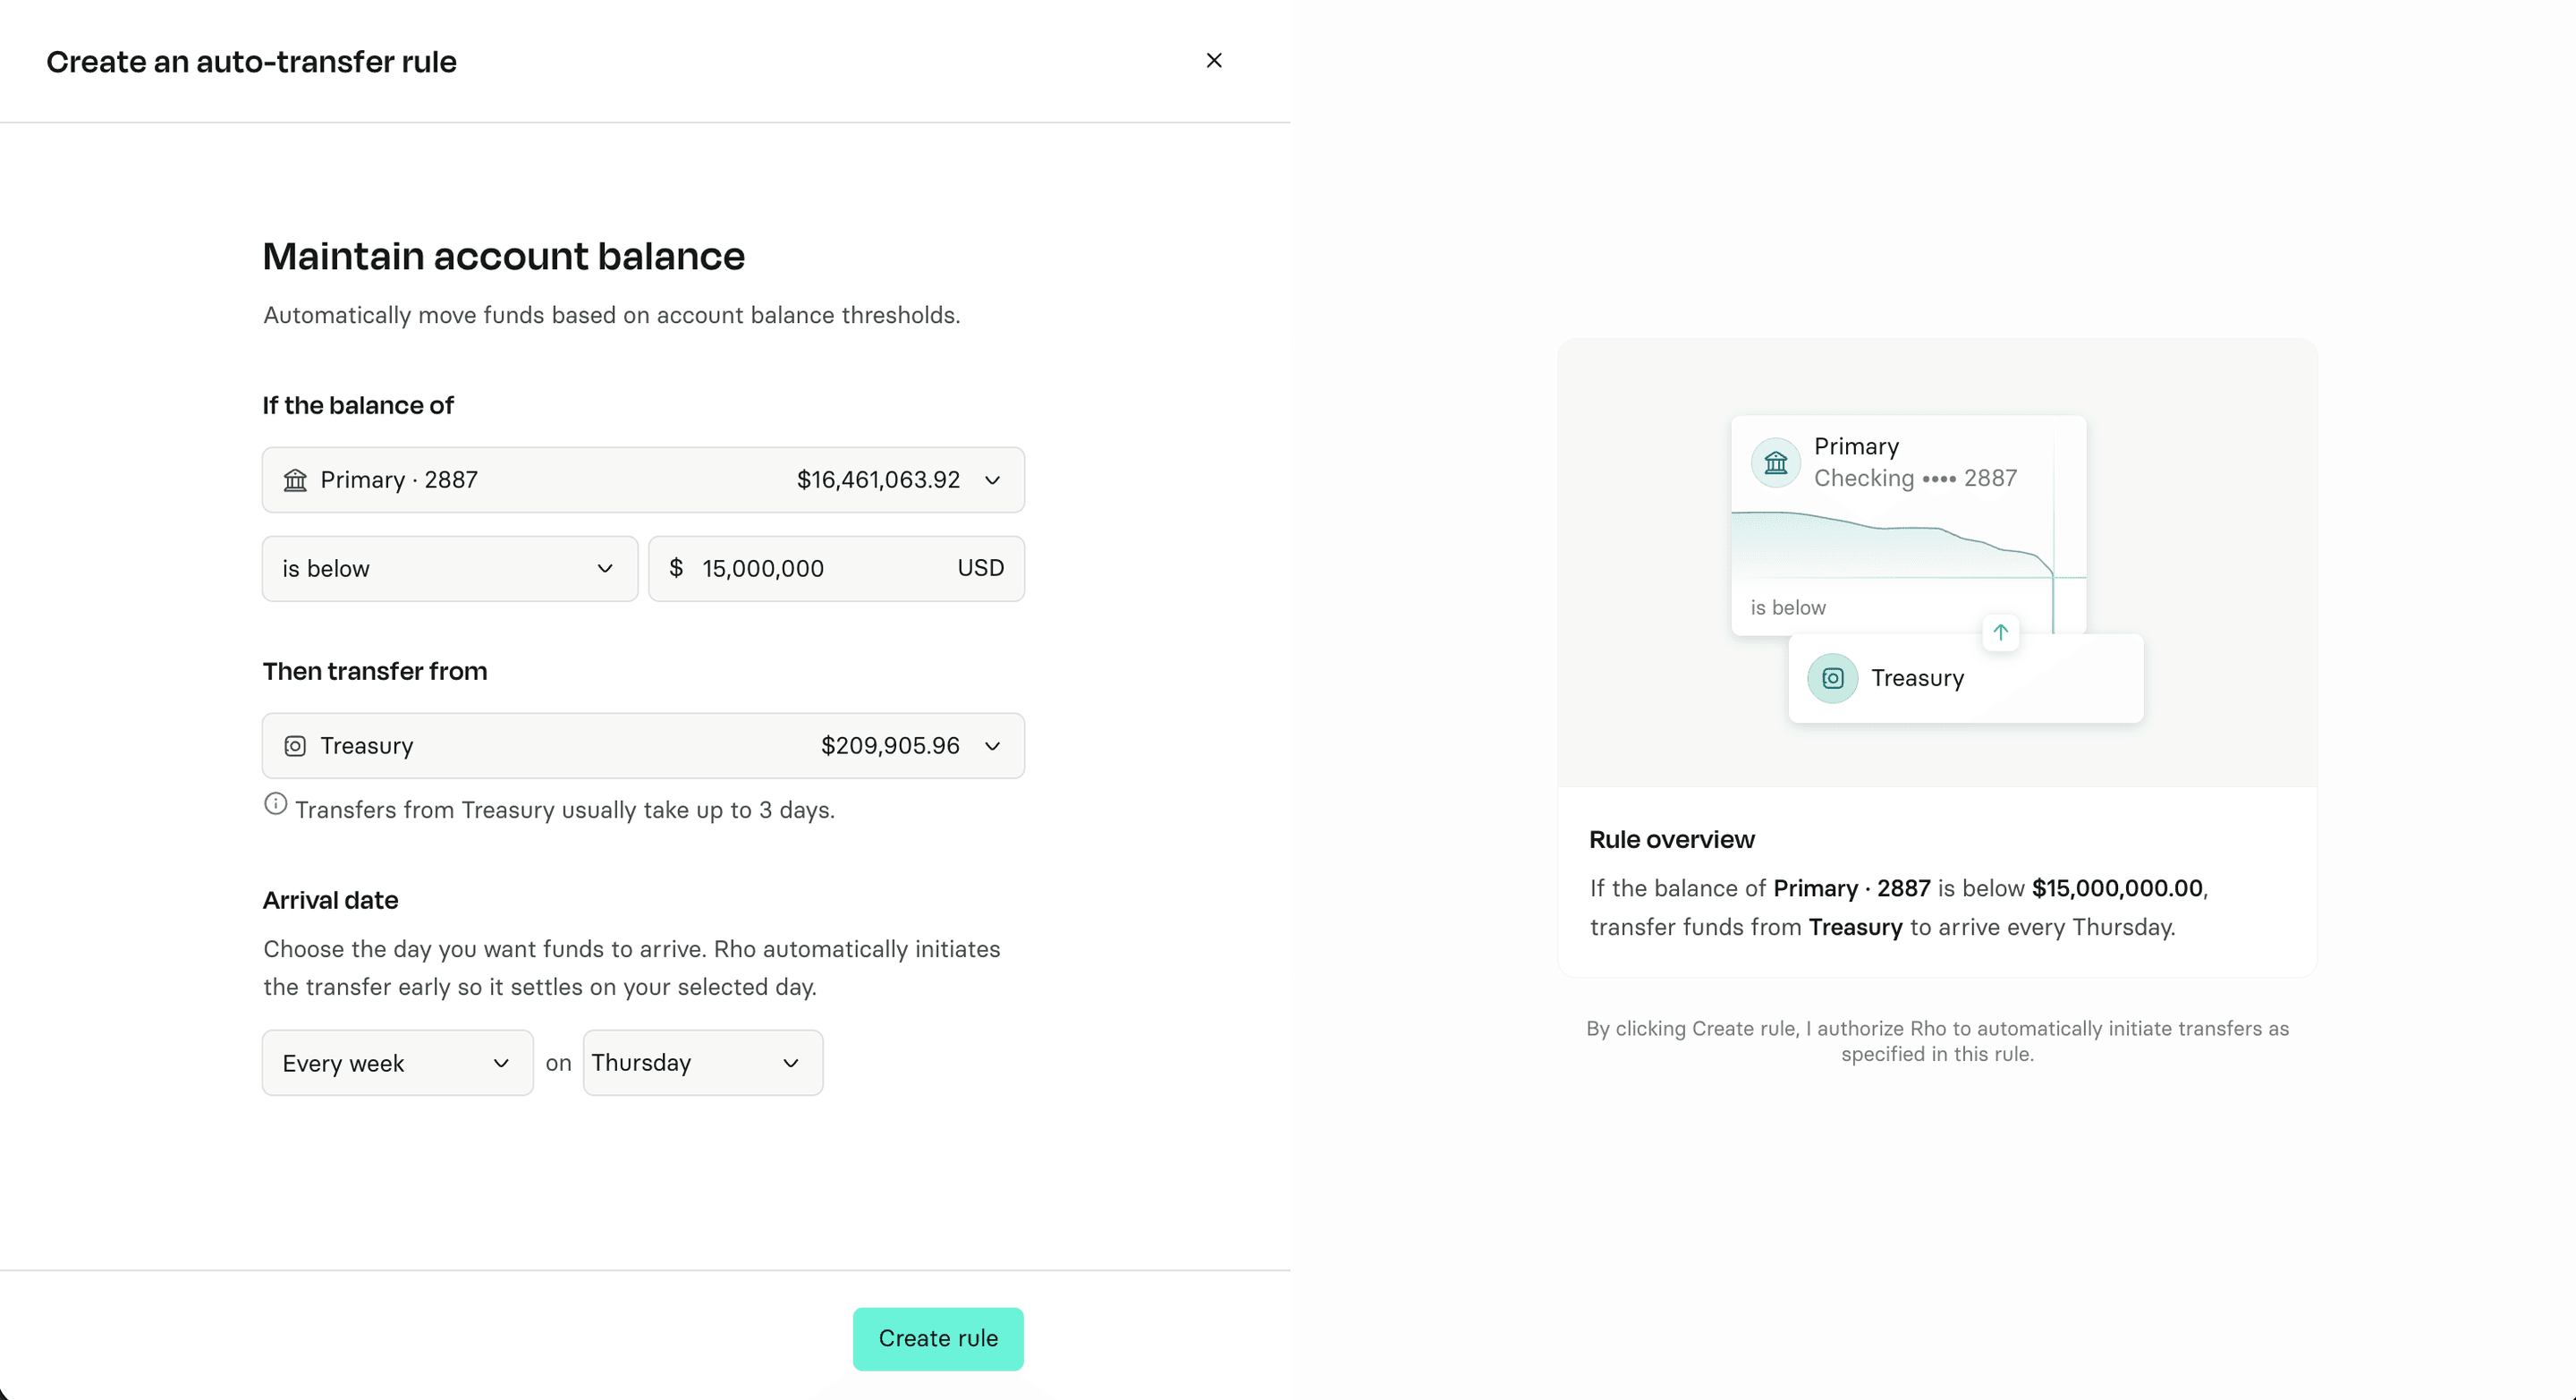
Maintain a minimum balance in Checking by transferring from Treasury
This is the most common rule for customers using Treasury. It helps keep your Checking account funded for payroll, vendor payments, and day-to-day operations.
Treasury liquidations can take up to three business days to settle, so this rule uses preset cadences with configurable dates. Select the cadence and dates that best fit your payroll and operating schedule.
Cadence | Settlement date | Common use case |
Weekly | Choose one day per week (Monday - Friday) for funds to settle | Weekly operations |
Twice monthly | Preset to 11th and 25th settlement | Bi-monthly payroll |
Monthly | Choose one date per month | Monthly payroll |
When applicable, Rho checks your Checking balance at 8 a.m. ET on business days. If your balance falls below your minimum, Rho initiates a Treasury liquidation so the funds settle on your next scheduled date.
Why these cadences?
Treasury → Checking transfers can take up to 3 business days to settle. These cadences are designed to help ensure funds are available in Checking when you need them, while keeping more of your excess cash working in Treasury. For additional flexibility between settlement dates, we recommend keeping about 3 months of operating cash in Checking.
 Rule limits
You can have up to 5 active auto-transfer rules per organization.
Each source and destination account pair can have only one rule.
Rules that would create a circular flow of funds are blocked. For example, you can't create both a Operating → Payroll minimum balance rule and a Payroll → Operating maximum balance rule between the same accounts.
Common scenarios
My Treasury account doesn't have enough funds
The transfer won't be completed, and you'll receive a notification.
The rule ran, but no transfer happened
Your account already met the balance requirement when the rule was evaluated, so no transfer was needed.
My execution date falls on a weekend or market holiday
The transfer runs on the prior business day.
Existing rule migration
If you previously used a Treasury sweep rule, it has automatically been migrated to a weekly schedule with Thursday settlement.
Before: Every day at 8:00 AM ET, if your Checking balance falls below $250,000, transfer at least $25,000 from Treasury.
After: If your Checking balance falls below $250,000, Rho initiates a Treasury sale in advance so funds settle in your Checking account every Thursday.
Your minimum balance and account settings remain the same. You can review or update the rule at any time from the Auto-transfer rules page.
Frequently asked questions
Are the preset Treasury schedules only for customers who were migrated from sweep rules?
No. The preset schedules apply to all Treasury → Checking maintain minimum balance rules.
Custom schedules are available for Checking ↔ Checking transfers.
Why is weekly the most frequent option for Treasury → Checking rules?
Treasury → Checking transfers can take up to 3 business days to settle. These cadences are designed to help ensure funds are available in Checking when you need them, while keeping more of your excess cash working in Treasury. For additional flexibility between settlement dates, we recommend keeping about 3 months of operating cash in Checking.
Can I create rules in both directions between the same two accounts? Can you use the same source account for two rules?
No. Each account pair supports only one rule in one direction, and each account can only be the source of one rule.
For example, if you have an Operating → Payroll rule and a Treasury → Operating rule:
You can't also create a Payroll → Operating rule for that same account pair.
You can't create another rule with Treasury as the source (e.g., Treasury → Payroll), since Treasury is already a source elsewhere.
Can one Treasury account fund multiple Checking accounts?
No, only one Checking account can be funded by Treasury.
What happened to the top-up amount from the previous sweep feature?
Auto-transfer rules now transfer only the amount needed to restore your account to its minimum balance.
If you'd like to maintain additional cash in your Checking account, set a higher minimum balance threshold or recurring transfer amount.
Need help?
If you have questions about setting up or managing auto-transfer rules, contact Rho Client Service at clientservice@rho.co or call 855-743-8746.